Friday, October 31, 2014
Nokia 2320 keypad is not working it can be cause of water damage or broken parts In this problem

So to solve keypad problem, Keypad not working problem solution check this ic which is used as keys controller.Re sold this ic or re flow this keypad ic. If resolding of keypad ic can not solve keypad problem you have to replace it or short with jumpers.
for more detail and new tips and tricks about cellphone service problem keep visiting this page we will update cellphone service diagrams timely with new cellphone diagrams.some related post are also given bellow you can read them also for more information about cellphone
Thursday, October 30, 2014
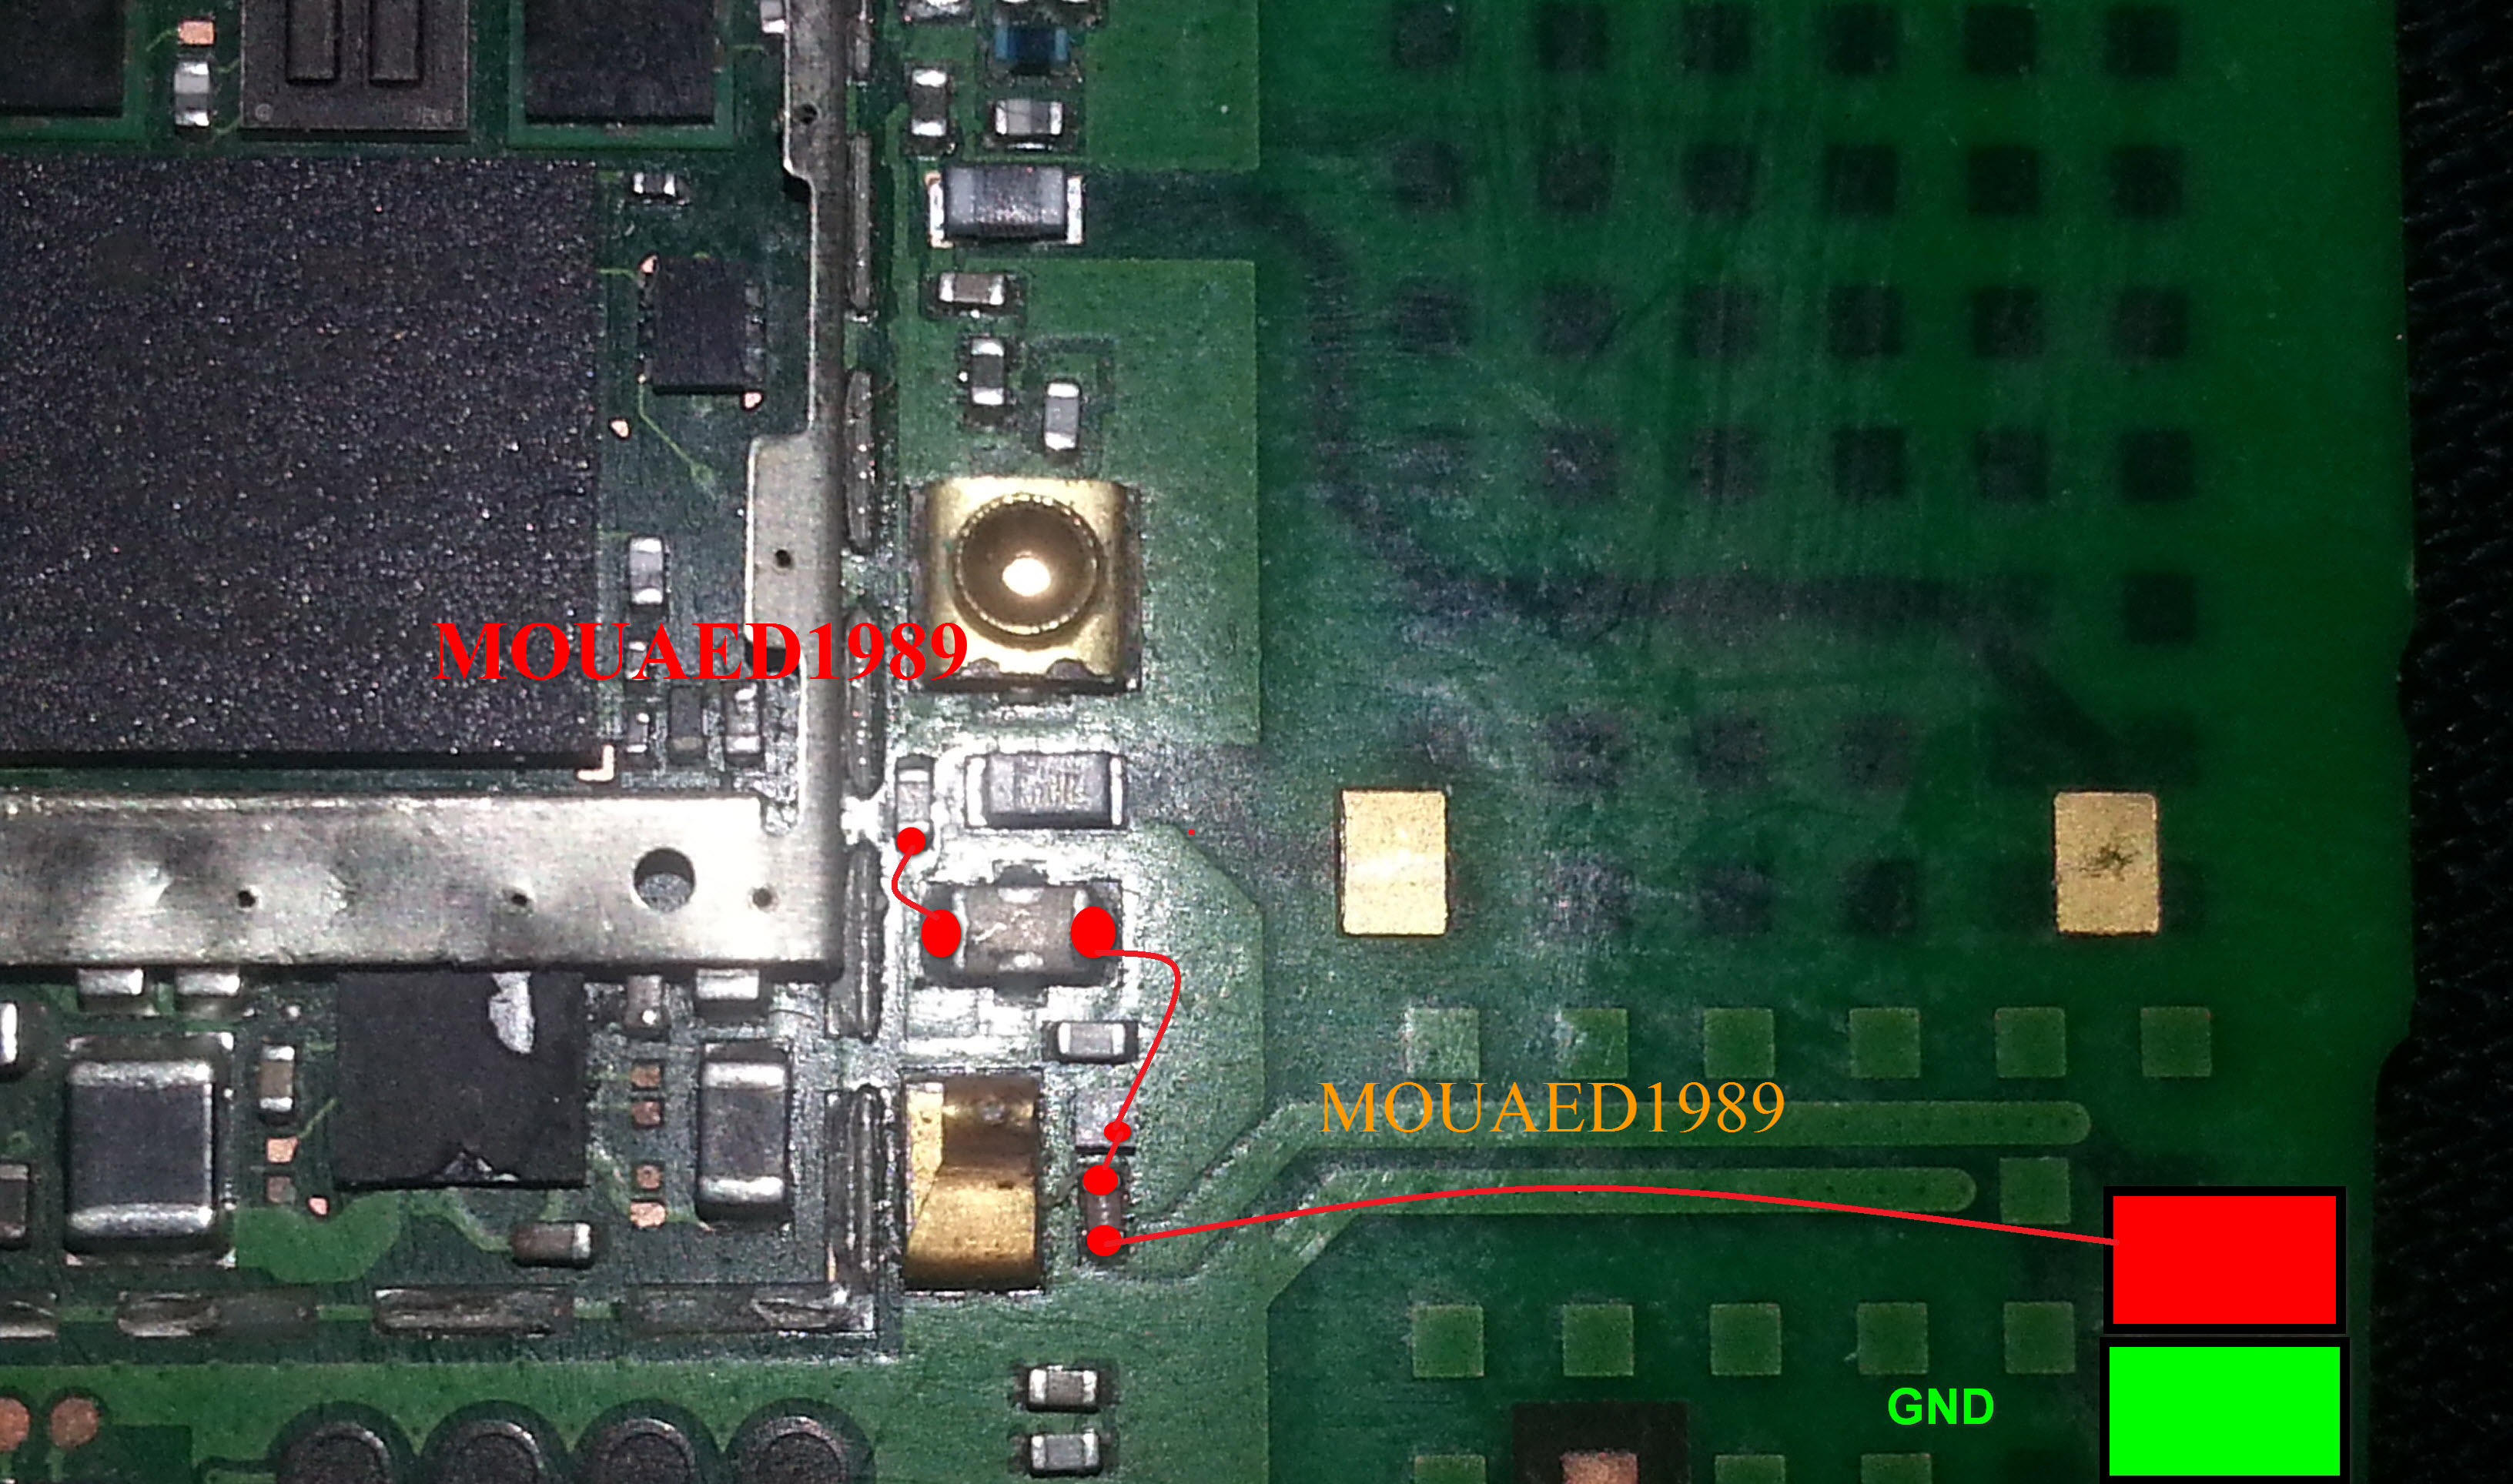
Nokia 1280 Not Charging Solution for charger no response problem
The solution below shows the charging circuit of nokia 1280 that holds and protect the device during charging operation. If these said circuit components get damaged it results to charging problem issues. These components were composed of a chip fuse, chip diode, filter coil and capacitor.
Just refer to the solution below to locate where these said components being mounted on Nokia 1280 PCB board.

If the fuse and the diode were both okay, you may then proceed to check the corresponding connected components before it. There is a voltage regulator transistor just near to the battery terminal that is also holds the Nokia 1280 charging circuit.
Wednesday, October 29, 2014
How to Reset Android Phone Motorola Droid
How to Reset Motorola Droid
To reset your phone to factory settings and erase all the data on your phone,Touch Menu > Settings
> Privacy > Factory data reset > Reset phone.
Warning: All data on your phone will be deleted.
Motorola Droid Hard reset with keys
Power off device.
Press X key on hard keyboard + power button, then release both buttons.
When you see exclamation point press and hold VOLUME UP + CAMERA KEY. You will see Android system recovery menu.
With D pad go to data / factory reset, then press CENTER D Pad, then choose Yes.
How to iPhone Master Reset or iPhone Restore a Apple Iphone 3G
Connect the iPhone to a computer, open up iTunes, then click " iPhone Restore button" which will wipe it clean of music and install the latest firmware it has.
Hard Reset Samsung Mobile T939 Behold 2
A hard reset restores your phone to factory settings. You will lose all data on your phone and you need to reinstall everything. So you must take note all your logins, apps you may have bought and so on so you can reinstall them or copy the files in phone memory to a safe place such as a memory card.
There are two different techniques to hard reset Samsung mobile T939 Behold 2. By using the device key or the setting menu.
Using the setting menu
1. From the main home screen, tap Quick List
2. Tap Settings, then Reset settings
3. Tap Master reset
4. Enter your password, then tap Yes to confirm
Note: The default password is 0000
Using the device key
1. Power off the phone.
2. Press and hold the Volume Down, Send and End buttons in that order. Make sure you pressed and hold the three buttons together and that the end key is pressed last.
3. When a graphic appears on the display, press the Menu key to begin the reset.
Nokia C5 06 Not Charging Problem Solution Jumpers
 If we want to solve not charging problem in Nokia C5-06 this diagram will help us to solve and fix this problem of charging in Nokia C5-06.Nokia Asha 202 Battery Terminal Jumper Solution
In this diagram red color line is to identify that charging path of Nokia C5-06.In solution of charging problem of Nokia C5-06 we have to check a few things as given bellow.
Plug in charger into Nokia C5-06 charging pin.
If it did not show any notification it can be fault of charging pin. Fault of charger or due to some missing components.
If shows not charging notification it can be cause of values of components.
So after dis assamble of Nokia C5-06 check all these things which are given above to solve not charging problem in Nokia C5-06.
This diagram is sent to us by one of our guest poster and it is taken from gem-flash a gsm portal.
for more detail and new tips and tricks about cellphone service problem keep visiting this page we will update cellphone service diagrams timely with new cellphone diagrams.some related post are also given bellow you can read them also for more information about cellphone.
Tuesday, October 28, 2014
Nokia C3 Qwerty Keypads Ways and Solution
membrane switch keypad must be absolutely clean. You may need a new replacement keypad membrane on it if the membrane switches is damaged and unable to pop up back when press.
Each corresponding keys are divided into group of rows and columns. The outer core layer of the keypad are group into rows and the inner core layer are group into columns. Each rows and columns are connected with each other.

The outer core are group from 0 to 7 rows. Each color on the picture indicate where that certain keys are connected to a group of rows.


Hardware Repair Tips for keypads: If just only one or two to four keys are not working the problem may lies an open or cut connection to it, trace where that certain keys does not work to the particular group of rows or columns it is being connected. You may apply a simple jumper wire on it as an alternative way. If more than five or more keys are not working you may consider that the problem lies on a damaged EMI-ESD filter chip
Nokia C5 00 Handfree IC Not working problem solution with jumpers

So once you have review the repairing diagram for Nokia C5-00 clean handfree jack and these parts that are identified in above diagram. Clean them with electronics cleaner and apply heat to dry the mother board.Do not apply much hot air because it can harm you skin and may can damage the mother board.
Remove the ic and apply jumpers as shown in section one of the diagram Then change the second part which is given in repairing diagram for handfree problem in Nokia c5-00.
for more detail and new tips and tricks about cellphone service problem keep visiting this page we will update cellphone service diagrams timely with new cellphone diagrams.some related post are also given bellow you can read them also for more information about cellphone.
Monday, October 27, 2014
Nokia 1800 and Nokia 1616 Insert Sim Card Problem Solutions

The Sim card circuit of Nokia 1616 and Nokia 1800 used an EMI filter chip for the circuit protection.
This EMI filter IC can be damaged if an excessive electromagnetic interference or electrostatic discharge interfere with the circuit. The Vsim which is the voltage being supplied to the sim card to make it work also cause the problem if being cut or damaged, this voltage range from 1.8 to 2.4 volts, the voltage varies according to the type of SIM card.
Repair hints for Insert SIM card Problem repair procedures:
1. You may check the circuit surroundings first and see to it that it is free from dirt, foreign object and corrosion, a corroded components may also cause the problem, clean it first as necessary.
2. You may start to check the VSIM line paths continuity by using a multimeter, start from the VSIM capacitor through to the SIM card pin connector, to check if that said line is okay.
3. Check the ground line of the sim card pin connector, If the ground line is cut it also cause the problem.
4. Remove the EMI filter chip if the above check up is okay, check the EMI filter IC internal line paths, from solder bumps; A2 and A3 are the line for the the SIM data and the resistance value is 100ohms, B1 and B3 SIM reset, the resistance value is 100 ohms also and then C1 and C3 for the SIM clock signals which has a resistance of 47 ohms. Replace it if found busted or damaged, you can easily find a replacement for it in other non working Nokia cell phone models PCB board that has an EMI filter IC also, just look for the solder bumps configuration if its same.
5. This part may need an adequate experience and extra care to handle with or you may end up killing the phone, if you are a beginner mobile phone techie you may need to ask assistance to your head tech or a senior and most experience one technician before doing this procedure.
Now if all the above does not solve the problem, you may need to reflow, rework, remove the main IC labeled X-gold 110, then check the solder bumps continuity through to the SIM pin connectors, then reball it and in-place it back.
Sunday, October 26, 2014
Nokia 1280 Keypad and LCD Display back light LED Solution
The solution below shows the entire LED light components circuit. You may need to check each of this components including particular connection line tracks.

Nokia 1800 and Nokia 1616 Power ON OFF switch Key Line paths for Nokia working solution
This problem may cause the device unable to power up when hitting the power key. The problem may easily configured if the power ON and OFF switch key has no response, but the device is not totally dead for it shows a charging indication when you charge it up. Now, this solution simply shows the line paths (ON OFF ways)of the power key.
You can check the power ON/OFF voltage to the inner core of the switch key terminal pads, this voltage may range approximately from 1to 3 volts. If there is no voltage reading you get on that spot, locate and trace the test spots for the power switch, see the picture guide above, it is located just near the keypad LED. Make a continuity check by using a multimeter to those corresponding spots indicated on the picture guide, from the power key pads through to each corresponding component. The outer core is connected to a chip capacitor located near the clock crystal oscillator.
Saturday, October 25, 2014
Sync Contacts on Android with Gmail Account

This method will help you to keep your contacts from the phone, or Google plus contacts synchronized with your Gmail account, you can easy perform all new changes and after that to sync with your Gmail account in several steps.
Syncing all your contacts stored in your Android device with Gmail accounts is important if you want to root your device, or to update with new firmware your phone.
When you’ll root or updating your phone, you’re risking always to lose data stored on your device, this data can be SMS text messages, MMS, and your contacts. This thing makes us search a solution to prevent this type of data corruption, for helps the Android Users to don’t corrupt them contacts I will present how sync the Android contacts with the Gmail account successfully.
Before guide, you should verify if your contacts are linked with your Gmail account.
- First Open Contacts.
- Now press the Menu>Settings button
- Select the ‘Merge with Google’ after that confirms the action. If you have more than one Gmail accounts you should select the one account which you want to be the default account to host your contacts.
- A pop-up notify message will appear if everything has been successfully merged.
How to sync your contacts with Gmail account guide:
- First verify if you have a Gmail installed on your Android device.
- Open the App Drawer>Settings>Accounts and Sync
- Enable the Accounts and syncing service.
- Now should select your Gmail account from the e-mail accounts setup.
- Verify and make sure that you have enabled ‘Sync Contacts’ Option.
- Press ‘Sync now’ button and now wait until all your contacts stored on your device have been successfully synchronized with your Gmail account.
- Open Gmail account on a web browser in an external PC and click the Gmail text link that is listed on the upper left side of your Gmail profile.
- Now should select Contacts and then see a page with all the contacts from your Android smartphone have been stored.
If you have rooted your device and select factory reset, or you’ve change the custom ROMs, then you’ll need to sync your Gmail account again with your device, and all the phone number and contacts will be restored in your phone; otherwise all your contacts will be remove.
Nokia 1616 and Nokia 1800 repair solution Microphone problem

1. Check or replace a new microphone replacement before proceeding..
2. make sure that microphones contact pads is absolutely clean, a poor contact pads of the microphones terminal also cause the problem.
3. check those two filter coil near the microphones contact pads, have a continuity check between the microphones contact pads core to each corresponding filter coil. The inner layer core is the positive and the outer layer core which is the negative.
4. Continue to check the line paths across to microphones circuit as shown on repair guide solution above. Trace and make sure that both positive and negative line is not cut or does not have an open circuit.
5. The B+ line indicated in the guide is the microphones circuit power supply, If this said supply voltage is missing or cut also causes the microphone nonfunctional.
A poor quality audio sound signal also occurs if there is a damaged components on that part.
6. The IC component solder ball bumps that holds the microphones connection can be used to trace those lines if an internal cut or damaged occurred, when all of the above hints does not solve the problem.
Friday, October 24, 2014
Android Phone Complete Note on What is Rooting and Benefits of Rooting Guide
Also Read: Data Backup Guide for Android Users
Benefits of rooting android phone
After rooting your android phone, you can do a number of advance tasks with your android phone. Find below some of the most important task you can do with your rooted android phone. advantages or benefits of rooted android phone includes:*** Runs various Apps which ask root permission: One of the great advantage of having an android powered phone is that, you can download and install tons of free apps from the Google Play Store which give your android experience a different level. However most of the great apps in Google Play Store works with rooted android phone. There are plenty of normal apps available which works with non rooted android phone but root apps allow more features and control to access system settings and tweak various features. So, if you have a rooted android phone, you can enjoy lots of great apps from Google Play Store.
Also Read: Download Latest Gapps for Android Phone
*** Flash Various Custom ROMs: One of the most important advantage of rooting android phone is that, you can enjoy various custom ROMs on a rooted android phone. If you don’t know, Custom ROMs are made from the source of official firmware by third party developer which provide many customizable features, increase overall processor speed, change the overall look of your android phone and many more. With a rooted android phone you can enjoy various custom ROMs like- CyanogenMod, ParanoidAndroid, AOKP, PACman, SLIM ROMs, MIUI and much more.
*** Free up lots of System Memory: One of the major complain of android users that internal memory is full of defaults apps and very low space for installing new apps. Its true that most android phone comes with huge system apps by default which takes a big amount of internal memory. But with a rooted android phone, you can transfer apps to External SD Card or install apps to SD card. Hence you can free up lots of internal memory space.
Disadvantages of rooting android phone
Yes, along with many benefits, rooted android phone have disadvantages too. Check out below to find disadvantages of rooting android phone.*** Rooting void manufacturer warranty: The main disadvantage of rooting android phone is that root void the phone’s manufacturer warranty. Means, once you rooted your phone, your phone’s manufacturer will not give you warranty even if your phone is in warranty period. The service centers will charge for any service they provide for the phone. But this is not a serious issue as you can un-root your device any time and get back your manufacturer warranty by re-installing the official firmware.
Also Read: Download USB Driver for Your Android Phone
*** Rooting might brick your phone: First up all you should know that rooting your phone is a very serious task and should be done carefully. You’ll find a number of rooting software and tools that help rooting process very easy even for normal user but ones should take help from advance android users who have already done the rooting process. Follow every step carefully while rooting your phone else you might end with Bricking your phone. Taking any wrong step or flashing corrupted root file may cause your phone brick, means your phone will be dead.
Hope you now understand what is rooting and disadvantages and benefits of rooting android phone. Rooting voids manufacturer warranty, rooting might brick your phone but if you can take the risk then you can experience all those great apps, custom ROMs and much more. Its now on you, whether you want to root your phone or not. If you want to know anything else related to rooting android phone, then feel free to contact with us using the comment form below.
Thursday, October 23, 2014
Blackberry 9000 cellular mobile repairing scatmaticks
Blackberry 9000 cellular mobile repairing scatmaticks ,blackberry 9000 cellular phone ful scatmathicks here, many time all my frind no idia for blackberry any ic registar tendester i have blackberry 9000 full scrien shot this picture all problem solved your see my picture this scatmatticks have blackberry 9000 mic way ,camera way power way rf pf battery way all have this speaker way all have this solution if u need any blackberry solution see my blog all posted tested here see all post and enjoy it,Blackberry 8900 trackpad Solution tested solution

see this scatmaticks and enjoy it and dont forget visit my blogger
Blackberry 8310 dead solution and shot not power on solution

Nokia X6 LCD Display Problem Full Solution

If those supply voltages seems to be okay and the LCD display ESD-EMI filter IC is working well and already been checked and replaced the solution below shows the next components that also needs to check, rework or replace. On Nokia X6 there is a display controller IC that is being used and connected on the LCD display circuit.

Blackberry 9500 cellular phone Keypad not working solution

Blackberry 9105 cellular phone keypad repair solution

Wednesday, October 22, 2014
Blackberry 9300 Cellular Phone No Display Light Repair Solution

I Phone 5 Home Button Not Working Ways Solution

Saturday, October 18, 2014
Nokia E63 Charging ways Solution

Nokia C2 00 Lcd Display Light Jumper Solutions

Do not apply much heat because it can damage the mother board or may can harm your skin.Check led lights because in some cases led are damage or removed from the mother board.
Resold led lights to solve led display lights problem in nokia c2-00. Apply jumper as given in above diagram to solve nokia c2-00 lights problem with jumpers.
for more detail and new tips and tricks about cellphone service problem keep visiting this page we will update cellphone service diagrams timely with new cellphone diagrams.some related post are also given bellow you can read them also for more information about cellphone.
Friday, October 17, 2014
cameraSony Ericsson F305 camera black only Problem

Nokia 7610 White Screen Display

Nokia 7610 White Screen Display
Nokia 7610 White Screen
Nokia 7610 Display Trac Ways
Nokia Asha 202 keypad problem solution with IC
Nokia C5-03 Insert Sim problem solution

Make it dry with hot air and do not apply much heat it can be dangerous for your skin and mother board.Resold this keypad IC and parts that are identified in above keypad repairing diagram for nokia asha 202.
If re sold of these parts can not solve keypad problem in nokia asha 202 then you have to replace them for solving nokia asha 202 keypad not working problem.
for more detail and new tips and tricks about cellphone service problem keep visiting this page we will update cellphone service diagrams timely with new cellphone diagrams.some related post are also given bellow you can read them also for more information about cellphone.
Thursday, October 16, 2014
Nokia 6230 6230i Keypad Problem

Nokia 6230 / 6230i Keypad IC Ways
Nokia 6230 / 6230i Keypad IC Jumpers
Nokia 6230 / 6230i keypad Tracks
Nokia 6230 / 6230i keypad jumpers
Wednesday, October 15, 2014
China 6300dual sim Warning! Invalid charger!

China 6300dual sim Warning! Invalid charger!
Tuesday, October 14, 2014

nokia x2 00 lcd ways
x2 00 lcd ways
problem lcd x200
nokia x2-00 lcd display
Nokia x2-00 lcd white problam
nokia x200 display
nokia x2 00 display ways
nokia x2-00 display light
nokia x2-00 display faulty
x200 full display ways
x200 lcd ways

In above diagram red line is given to identify the LCD filter IC location. These two LCD IC are used in Display function of Nokia X2-00. Keep in mind if there is some rust or carbon and water damages make it clean with electronics clean and then apply hot air to make it dry.
Monday, October 13, 2014
nokia 111 ringer jumper solution

In above diagram blue and red color lines are given so that you can find out components that are used in ringer function. Check these parts with electronics meter and apply jumpers to solve ringer problem in nokia 111 with jumpers.
Thursday, October 2, 2014
China Nokia 5310 Flash File

if you check it much give few comments about this so that others can learn form your comments also.
If you have any other Questions please do not hesitate to share with me.

LG Intuition VS950 Hard Factory Reset Instructions
LG Intuition VS950 Hard / Factory Reset Instructions - the LG Intuition VS950 is smartphone that support for CDMA/LTE network. It has 5.0 inches, HD-IPS LCD capacitive touchscreen, 768 x 1024 pixels resolution and support 16M colors. The phone measuring 139.7 x 90.4 x 8.4 mm and powered by Dual-core 1.5 GHz processor with 1GB of RAM. The LG Intuition VS950 runs on Android 4.0.4 (Ice Cream Sandwich) operating system also equipped with 8 MP camera. Ok, by the way if you are owner of this phone and you have problem for example forget your unlock sequence and the Backup PIN, you can follow this instructions to factory reset / hard reset
LG Intuition VS950 Hard / Factory Reset Guide:
-First, turn the device off
-Then, press and hold the following keys at the same time for 5 seconds: Volume Down Key + Power/Lock Key
-Further, read the FACTORY HARD RESET screen message. Press the Power/ Lock Key to confirm or any other key to cancel
-Next instructions, you will be prompted to confirm again. Press the Power/Lock Key one more time to confirm and perform the factory reset. Or press any other key to cancel.
Factory data reset: Opens a screen to erase all of the data on the phone. Read the warning, then tap Reset phone at the bottom of the screen.
Wednesday, October 1, 2014
Nokia c2 06 charging problem solution

How to do this work : If you face this problem then first check your charger next check charging socket. If you see they are ok but problem still then check this red mark line if you found any fault then repair that fault using this picture.
You may also like:
Nokia 100 charging problem solution
Nokia 305 charging problem solution