

 Motorola Test PointDownload,
Sunday, August 31, 2014
Gfive w5 ear speaker solution
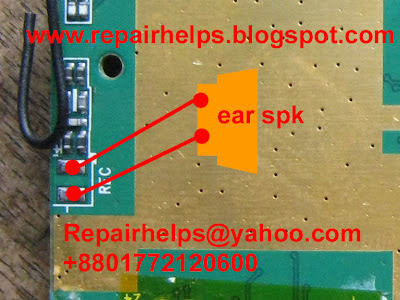
First check ear speaker if damage ear speaker change speaker.If ear speaker ok but problem stiill. Next check ear speaker ways, if you see broken ear speaker ways make this jumper.
5130c 2690 2700 power on vibret and without light nokia logo

5130c 2690 2700 power on vibret and without light nokia logo
Apple iPad File Manager Access Problem Solution
Apple iPad File Manager Access Problem Solution : Apple iPad is one of the most significant tab and pc notebook for working. Its contains thousands of apps, programs and features. But to access to the computer its very big problem to access. There is no way to access file manager of Apple iPad Tab. These Tab need to access from computer to import file, folders or apps. In this situation need a software to access the file manager of Apple iPad Tabs. Click here to download the software. Then go to the software open it, click on device, then click on import to insert file from your computer. Its a big solution to access Apple iPad file manager, Apple iPad data and all kinds of apps. So try it if you dont have the software. Otherwise Apple iPad does not give any permission to access file manager. Its only show the image file in the computer. iTunes will help you to connect with all kinds of file or folder. An apps is available named MyDisk in Apple iPad Tab. When you launch it, all kind of files, music folder, apps you can see which are downloaded or imported from computer.
Saturday, August 30, 2014
How To Update Samsung S5280 Galaxy Star Firmware Version Manual Update Guide via Odin
What is Firmware Update Process and Why We Need it:
The Firmware Update process means that your device will get a newer software version or we can say it will run with a newer version of its Operating System, For example if your Samsung Android device is running Android version 4.0.4 and Samsung release Android 4.1.2 version, Then you need to perform a Firmware Update process to install the new version into your device.
Mostly the new Firmware version is released to fix some bugs or to add some new functions, And sometimes it is released to fix some security threats.
What we should do before performing the update:
- First of all you should know your current device firmware version, Write it down so in case something goes wrong it will help you to fix your device.
- Check that you got the suitable firmware package for your device, And make sure to get it from trusted sources only.
- Check your devices battery level to be at least at 90%, Otherwise charge it before starting the update process.
- Make sure to backup any saved data into your device, Like contacts, messages...etc.
Needed Downloads For Updating Samsung S5280 Galaxy Star Firmware:
- Samsung S5280 Galaxy Star Stock Firmware Package.
- Odin Flasher.
- Samsung S5280 Galaxy Star USB Drivers.
Needed Tools For Updating Samsung S5280 Galaxy Star Firmware:
- Suitable USB cable.
- A stable computer running Windows OS.
Important Notice: We provide this guide for help purpose only, And we hold no responsibility at all, So keep in mind that your are doing this at your own RISK.
Preparation:
After downloading the needed files you should extract the zipped ones, And install the USB drivers (Restart your PC after installing).
Samsung S5280 Galaxy Star Firmware Update Steps:
- Turn off the device, And take out its battery, SIM and memory cards.
- Run Odin.exe program.
- Check these options: Re-Partition (If you have PIT file only), Auto Reboot, F.Reset Time.
- Click PIT button to select: mintss.pit
- Firmware files selection:
Click Bootloader button to select: BOOTSPL_S5280xxxxxx_..._REV03_user_low_ship.tar.md5
Click PDA button to select: CODE_S5280xxxxxx_..._REV03_user_low_ship.tar.md5
Click Phone button to select: MODEM_S5280xxxxxx_REV03.tar.md5
Click CSC button to select: CSC_Oxx_S5280Oxxxxxx_..._REV03_user_low_ship.tar.md5
- Entering the Download Mode:
Put the battery back into your device, Press and Hold Volume Down key + Home key + Power, After you get the warning message release all keys and press Volume Up key.
- Use the USB cable to connect your device to the computer, Dont use any USB-HUB for connecting, And use only main USB slots.
- Wait until Windows detects the connected device and installs its suitable USB drivers.
- In case everything is OK, Then Odin program will detect your connected device (0:[COMxx]).
- Click on Start button.
- Odin program will start installing the new firmware files into your device, So wait until the device reboots.
- If the update was successfully done, Then you will notice PASS! Word at Odin program.
- Disconnect the USB cable.
- Check your device firmware version *#1234# (You should see the new installed one).
- Turn off the device again, Reinsert the SIM and memory cards and turn it on.
- Now you can customize your device after installing the new firmware version.
- If you made any backup of your device data before the update then you can restore it again.
- Done.
Notice: When you get one big file inside the firmware package, Then it should be selected as a PDA file only, And do not check Re-Partition option or use PIT file at all.
Notice: When you get one big file inside the firmware package, Then it should be selected as a PDA file only, And do not check Re-Partition option or use PIT file at all.
Samsung Galaxy Tab 8 9 i957 Factory data reset
Hard reset via Settings menu
- select Apps from home screen or press Menu Key
- select Settings
- select Privacy
- select Factory data reset
- select Reset device
- select Erase everything. It will automatically reset and may not function for up to 15 minutes following the master reset.
To avoid permanent damage to your device, do not restart your device while a reset procedure is underway.
Warning! All data will be erased from device memory, including system and application data, settings and downloaded applications. Back up your important data. The device will restore to factory settings.
Hard reset via external hardware keys by entering android system recovery
- Turn off the device
- Press dan hold Volume Up button and Power Button simultaneously till the screen turns up and Samsung logo blinks for two times.
- Then release the Power key but keep the Volume Up key pressed till you see Android system recovery screen.
- select Wipe data / factory reset using Volume Down key to highlight.
- Press home key.
- select Reboot system now
- Press home key.
Only do this if you can not do it via Setting menu.
Performing Soft Reset
If your phone or tab hangs or does not responding, try to Press and hold power key about 10 seconds. It will rebooting automatically. Or try to remove and re insert the battery and SIM Card ( If available ).
Friday, August 29, 2014


China Mobile Phone Hardware Repair and Pin outs
This software packed with china mobile phone pin-out pictures, to be used as a guides on locating pin-outs on selected china phone devices; This includes also some hardware repair guides, just download and its free for all.


Thursday, August 28, 2014
Get Easily install Guide Using Android 4 4 2 KitKat PAC man ROM For HTC One XL Free Download
Android or Google Android is the latest craze in the mobile market. Everyone wants to have an Android powered Smartphone as it comes with many great features and apps and users can also download tons of apps and games from the Google Play Store. The main plus point of the Android is that its a product of the search engine giant Google and comes preloaded with great services of Google such as- Google Search, Google Maps, Gmail, Google Plus, YouTube, Google Sync, Google Play Store and many more. Apps makes a phone complete and you can’t even imagine a modern Smartphone without having all these great apps from Google. By default your Android phone comes with most of the above Gapps but you can always download or update latest Gapps for android from Google Play Store.
 Google Apps or Gapps includes- Google Play Store, Google Search, Google Voice search, YouTube, Gmail, Gtalk, Google Maps, Google Music, Google Sync, Google Docs, Google Backup Transport, Google Currents, Google Calendar, Car Home.
Although Android phone preloaded with Gapps package but for some cases you may need to install Gapps manually. All most all Stock firmware or official firmware come with Gapps package but when you wish to flash custom ROM, you need to install separate Gapps package as most of the custom ROM developers are not including Gapps with their ROM. So, if you are a frequent custom ROM flasher, you have to install latest Gapps package through custom recovery after installing the ROM to get all those great Google services.
Also Read: Backup Data and Settings on Android Phone
In Google Play Store, you have to download each Google apps separately, so it’ll be better if we find a complete Gapps package to get all those apps at a time. Google Play Store occasionally provide update for all their apps to add new feature and bug fixes, so we should upgrade our device to the latest Google Services. But updating all those apps separately will take a lot of time instead we can find latest Gapps package and flash through CWM Recovery or TWRP Recovery.
In this article, you’ll find latest Gapps package for your android phone running on any android version (Gingerbread, Ice Cream Sandwich, Jelly Bean) and some special Gapps package for custom ROM like- CyanogenMod, ParanoidAndroid, Slim ROMs, MIUI and many more. Download Gapps for android from the below.Also Read: Download USB Driver for Android Phone
Download Latest Gapps for Android Kitkat 4.4.4
(Gapps Standard 4.4.4 signed Zip) Mirror Link or Any Other 4.4 Kitkat Gapps
Paranoid Android 4.4.4 kitkat Gapps Pa_GApps_Stock_4.4.4-20140620-signed.zip signed.zip
Download Latest Gapps for Android Kitkat 4.4.2
Browser: Download
E-mail: Download
Flipboard: Download
All Google apps: Download
Hancom Office: Download
Launcher (Magazine UX): Download
Music Player: Download
Samsung Account: Download
Snote: Download
Sound Recorder: Download
WatchON: Download
Download Latest Gapps for Android Jelly Bean
Universal Jelly Bean Gapps Package Download Android 4.3 Gapps- gapps-jb-20130813-signed.zip or gapps-jb-20130726.zip
Download Android 4.2.2 Gapps- gapps-jb-20130812-signed.zip or gapps-jb-20130301-signed.zip
Download Android 4.2.2 Minimal Gapps- Android 4.2.2 Gapps Minimal
Download Android 4.2.1 Gapps- gapps-jb-20121212-signed.zip or gapps-jb-20121130-signed.zip
Download android 4.1.2 Gapps- gapps-jb-20121011-signed.zip
Download Latest Gapps for Android ICS (Ice Cream Sandwich)
Universal ICS Gapps Package
Download Android 4.0 Gapps- gapps-ics-20120429-signed.zip or gapps-ics-20120131-signed.zip
Download Latest Gapps for Android Gingerbread (GB)
Universal Gingerbread Gapps Package
Download Android 2.3 Gapps- gapps-gb-20110828-signed.zip
Download Android Gapps for CyanogenMod Custom ROMs
Download Gapps for CM10.2 Android 4.3 Custom ROM- gapps-jb-20130813-signed.zip
Download Gapps for CM10.1 Android 4.2.2 Custom ROM- gapps-jb-20130812-signed.zip or gapps-jb-20130301-signed.zip
Download Gapps for CM10.0 Android 4.1 Custom ROM- gapps-jb-20121011-signed.zip
Download Gapps for CM9 Android 4.0 Custom ROM- gapps-ics-20120429-signed.zip
Download Android Gapps for Paranoid Android Custom ROMs
Download Gapps for Paranoid Android Custom ROM- Paranoid Android Gapps
Download Android Gapps for MIUI Custom ROM
Download Gapps for MIUI Jelly Bean Custom ROM- gapps-jb-20121011-signed.zip
Download Gapps for MIUI ICS Custom ROM- gapps-ics-20120429-signed.zip
Also get MIUI Gapps from - MIUI Gapps
Download Android Gapps for Backed Custom ROM
Download Gapps for Backed Custom ROM- Backed ROM Gapps
Download Android Gapps for SLIM ROMs
Download AIO Gapps for Slim Bean Custom ROM- slim-aio-gapps-4-3-build-1
Download Minimal Gapps for Slim Bean Custom ROM- slim-minimal-gapps-4-3-build-1
So, download latest Gapps for android from the above list and flash through custom recovery. Hope you find latest Gapps for your android version in the above list. If you face any problem with downloading any Gapps file or download link not working or looking for any other Gapps package, then feel free to contact with us using the comment form below.
Read More..
Although Android phone preloaded with Gapps package but for some cases you may need to install Gapps manually. All most all Stock firmware or official firmware come with Gapps package but when you wish to flash custom ROM, you need to install separate Gapps package as most of the custom ROM developers are not including Gapps with their ROM. So, if you are a frequent custom ROM flasher, you have to install latest Gapps package through custom recovery after installing the ROM to get all those great Google services.
Also Read: Backup Data and Settings on Android Phone
In Google Play Store, you have to download each Google apps separately, so it’ll be better if we find a complete Gapps package to get all those apps at a time. Google Play Store occasionally provide update for all their apps to add new feature and bug fixes, so we should upgrade our device to the latest Google Services. But updating all those apps separately will take a lot of time instead we can find latest Gapps package and flash through CWM Recovery or TWRP Recovery.
In this article, you’ll find latest Gapps package for your android phone running on any android version (Gingerbread, Ice Cream Sandwich, Jelly Bean) and some special Gapps package for custom ROM like- CyanogenMod, ParanoidAndroid, Slim ROMs, MIUI and many more. Download Gapps for android from the below.Also Read: Download USB Driver for Android Phone
Download Latest Gapps for Android Kitkat 4.4.4
(Gapps Standard 4.4.4 signed Zip) Mirror Link or Any Other 4.4 Kitkat Gapps - See more at: http://blogspot.com/2014/07/install-android-442-kitkat-on-at_15.html#sthash.OaLNARyy.dpuf
(Gapps Standard 4.4.4 signed Zip) Mirror Link or Any Other 4.4 Kitkat Gapps
Paranoid Android 4.4.4 kitkat Gapps Pa_GApps_Stock_4.4.4-20140620-signed.zip signed.zip
Download Latest Gapps for Android Kitkat 4.4.2
Browser: Download
E-mail: Download
Flipboard: Download
All Google apps: Download
Hancom Office: Download
Launcher (Magazine UX): Download
Music Player: Download
Samsung Account: Download
Snote: Download
Sound Recorder: Download
WatchON: Download
Download Latest Gapps for Android Jelly Bean
Universal Jelly Bean Gapps Package Download Android 4.3 Gapps- gapps-jb-20130813-signed.zip or gapps-jb-20130726.zip
Download Android 4.2.2 Gapps- gapps-jb-20130812-signed.zip or gapps-jb-20130301-signed.zip
Download Android 4.2.2 Minimal Gapps- Android 4.2.2 Gapps Minimal
Download Android 4.2.1 Gapps- gapps-jb-20121212-signed.zip or gapps-jb-20121130-signed.zip
Download android 4.1.2 Gapps- gapps-jb-20121011-signed.zip
Download Latest Gapps for Android ICS (Ice Cream Sandwich)
Universal ICS Gapps Package
Download Android 4.0 Gapps- gapps-ics-20120429-signed.zip or gapps-ics-20120131-signed.zip
Download Latest Gapps for Android Gingerbread (GB)
Universal Gingerbread Gapps Package
Download Android 2.3 Gapps- gapps-gb-20110828-signed.zip
Download Android Gapps for CyanogenMod Custom ROMs
Download Gapps for CM10.2 Android 4.3 Custom ROM- gapps-jb-20130813-signed.zip
Download Gapps for CM10.1 Android 4.2.2 Custom ROM- gapps-jb-20130812-signed.zip or gapps-jb-20130301-signed.zip
Download Gapps for CM10.0 Android 4.1 Custom ROM- gapps-jb-20121011-signed.zip
Download Gapps for CM9 Android 4.0 Custom ROM- gapps-ics-20120429-signed.zip
Download Android Gapps for Paranoid Android Custom ROMs
Download Gapps for Paranoid Android Custom ROM- Paranoid Android Gapps
Download Android Gapps for MIUI Custom ROM
Download Gapps for MIUI Jelly Bean Custom ROM- gapps-jb-20121011-signed.zip
Download Gapps for MIUI ICS Custom ROM- gapps-ics-20120429-signed.zip
Also get MIUI Gapps from - MIUI Gapps
Download Android Gapps for Backed Custom ROM
Download Gapps for Backed Custom ROM- Backed ROM Gapps
Download Android Gapps for SLIM ROMs
Download AIO Gapps for Slim Bean Custom ROM- slim-aio-gapps-4-3-build-1
Download Minimal Gapps for Slim Bean Custom ROM- slim-minimal-gapps-4-3-build-1
So, download latest Gapps for android from the above list and flash through custom recovery. Hope you find latest Gapps for your android version in the above list. If you face any problem with downloading any Gapps file or download link not working or looking for any other Gapps package, then feel free to contact with us using the comment form below.
Delok Philips Fisio Service tool v4 0 Full
Fisio Service tool 4 Full
Fisio Service tool 3.9 Full
 Fisio Service tool 3.0 Full
 Supported Modeles:
unlock Philips
Fisio 620/625/820/822/825/826,330,9@9++,350,
355/Hair,v100,530,535,630,636/639,659,755,855
Az@lis 238,Az@lis 288,Ozeo,Xenium,Fisio 311
Fisio 316,Fisio 120,Fisio 121
Download here
Read More..

Fisio Service tool 3.9 Full
 Fisio Service tool 3.0 Full
 Supported Modeles:
unlock Philips
Fisio 620/625/820/822/825/826,330,9@9++,350,
355/Hair,v100,530,535,630,636/639,659,755,855
Az@lis 238,Az@lis 288,Ozeo,Xenium,Fisio 311
Fisio 316,Fisio 120,Fisio 121
Download here

LG G Flex Tips and Tricks
How to Hard Reset LG G Flex Using Buttons
We have our own reasons why we hard reset our device. Maybe we want to delete all the files and restore the device to its original state. It could also be the device may be malfunctioning or so slow and it needs to be reset. Use this method only if the factory reset wont work.
Restoring the default settings or factory reset your LG G Pro 2 will delete all your existing files. It is recommended to backup your important files on your computer before attempting to reset your device.
1. Switch off your device. If it is frozen, remove your battery and insert it again.
2. Press and hold the following keys: Volume Down Key + Power/Lock Key.
3. Release the keys as soon as Recovery mode is displayed.
4. Press the Volume Down Key to scroll to wipe data/factory reset. Then press the Power/Lock Key to select it.
5. Press the Volume Down Key to scroll to Yes -- delete all user data. Then press the Power/Lock Key to select it.
6. The phone will perform a factory reset.
7. Make sure that reboot system now is highlighted and press the Power/Lock Key to make the selection and reboot your phone.
How to Backup and Factory Reset LG G Flex
Resetting your LG G Pro 2 will restore the default settings of your device. It will also delete all your files on your phone, so it is recommended to backup all your important files on your computer.
Luckily in LG G Pro 2, you can backup your data through your phone on privacy settings before wiping all the data on your phone. But if you want to erase all the content on your phone, then there’s no need for you to backup your data.
To backup your data:
You can only backup app data, Wi-Fi passwords, and other settings to Google servers.
Step 1. Tap on the Home Icon > Menu icon.
Step 2. Select System settings > Backup & reset.
Step 3. Double check if the Backup account is correct.
Step 4. Then tap Back up my data. (A blue checkmark will appear.)
Step 5. If you want to set to the automatic restore backups, tap Automatic restore. (A blue checkmark will appear.)
To Factory Reset Your LG G Flex:
Step 1. Tap on the Home Icon > Menu icon.
Step 2. Select System settings > Backup & reset.
Step 3. If you want to proceed in restoring the factory settings, tap Factory data reset.
Step 4. Then tap Reset phone.
Step 5. Enter the unlock sequence if you have, then tap Erase everything to confirm.
When this feature is turned on, you can beam app content to another NFC-capable device by holding the devices close together. For example, you can beam Browser pages, YouTube videos, contacts, Polaris Office 4 files, and more. Just bring the devices together (typically back to back) and then touch your screen. The app determines what gets beamed.
SmartShare Beam
Turn on to receive multimedia contents via SmartShare Beam from LG phones or tablets.
Turn On SmartShare Beam:
1. Tap Home icon > Menu icon > System settings > Share & connect.
2. Tap the SmartShare Beam and tap the SmartShare Beam switch to activate the feature.
3. Turn on the SmartShare Beam feature on other LG phones or tablets supporting SmartShare Beam to send/receive photos, musics, videos and documents.
Miracast
You can mirror phone screen and sound onto LG Miracast dongle or TV wirelessly.
1. Tap Home icon > Menu icon > System settings > Share & connect > Miracast.
2. Tap the Miracast switch to turn on this feature.
3. Turn on the Miracast feature on your TV or connect to a LG Miracast dongle
Wireless Storage
To manage files on your phone in the computer or copy files to the phone from the computer without a USB connection.
Turn On Wireless Storage:
1. Tap Home icon > Menu icon > System settings > Share & connect.
2. Tap the Wireless storage and tap the Wireless storage switch to activate the feature.
3. Connect to a network, then select the devices to allow connection.
4. Enter the URL shown on your phone in the address bar of the browser on your computer to access your phones photos and other files wirelessly from your computer.
Font Size
Choose the desired font size for device menus.
1. Tap on the Home Icon > Menu icon > System settings.
2. From the DEVICE section, tap Display > Font size.
3. Tap a desired font size.
Smart Screen
Keep the screen on when device detects your eyes looking at the screen.
1. Tap on the Home Icon > Menu icon > System settings.
2. From the DEVICE section, tap Display > Smart screen (A blue checkmark will appear).
Smart Video
Video pauses when the phone detects you are not looking at the screen.
1. Tap on the Home Icon > Menu icon > System settings.
2. From the DEVICE section, tap Display > Smart video (A blue checkmark will appear).
Read More..
We have our own reasons why we hard reset our device. Maybe we want to delete all the files and restore the device to its original state. It could also be the device may be malfunctioning or so slow and it needs to be reset. Use this method only if the factory reset wont work.
Restoring the default settings or factory reset your LG G Pro 2 will delete all your existing files. It is recommended to backup your important files on your computer before attempting to reset your device.
1. Switch off your device. If it is frozen, remove your battery and insert it again.
2. Press and hold the following keys: Volume Down Key + Power/Lock Key.
3. Release the keys as soon as Recovery mode is displayed.
4. Press the Volume Down Key to scroll to wipe data/factory reset. Then press the Power/Lock Key to select it.
5. Press the Volume Down Key to scroll to Yes -- delete all user data. Then press the Power/Lock Key to select it.
6. The phone will perform a factory reset.
7. Make sure that reboot system now is highlighted and press the Power/Lock Key to make the selection and reboot your phone.
How to Backup and Factory Reset LG G Flex
Resetting your LG G Pro 2 will restore the default settings of your device. It will also delete all your files on your phone, so it is recommended to backup all your important files on your computer.
Luckily in LG G Pro 2, you can backup your data through your phone on privacy settings before wiping all the data on your phone. But if you want to erase all the content on your phone, then there’s no need for you to backup your data.
To backup your data:
You can only backup app data, Wi-Fi passwords, and other settings to Google servers.
Step 1. Tap on the Home Icon > Menu icon.
Step 2. Select System settings > Backup & reset.
Step 3. Double check if the Backup account is correct.
Step 4. Then tap Back up my data. (A blue checkmark will appear.)
Step 5. If you want to set to the automatic restore backups, tap Automatic restore. (A blue checkmark will appear.)
To Factory Reset Your LG G Flex:
Step 1. Tap on the Home Icon > Menu icon.
Step 2. Select System settings > Backup & reset.
Step 3. If you want to proceed in restoring the factory settings, tap Factory data reset.
Step 4. Then tap Reset phone.
Step 5. Enter the unlock sequence if you have, then tap Erase everything to confirm.
How To Make Your LG G Flex a WiFi Hotspot
Do you want to share your Internet connection for your friends? With LG G Pro 2, you can now share your connection with up to 5-8 devices by turning on the portable Wi-Fi hotspot. You will notice an icon in the Status bar when your phone is sharing a data connection.
To share your phone’s data connection as a portable Wi-Fi hotspot:
1. Tap on the Home Icon > Menu icon.
2. Go to System settings > More... > Wi-Fi hotspot.
3. Tap the Portable Wi-Fi hotspot switch to activate it. After a moment, the phone starts broadcasting its Wi-Fi network name (SSID), so you can connect it with up to eight (8) computers or other phones.
4. To change the network name (SSID) or secure its Wi-Fi network, tap Set up Wi-Fi hotspot.
2. From the DEVICE section, tap Lock screen > Select screen lock.
3. Select the desired screen lock option from the following options.
Do you want to share your Internet connection for your friends? With LG G Pro 2, you can now share your connection with up to 5-8 devices by turning on the portable Wi-Fi hotspot. You will notice an icon in the Status bar when your phone is sharing a data connection.
To share your phone’s data connection as a portable Wi-Fi hotspot:
1. Tap on the Home Icon > Menu icon.
2. Go to System settings > More... > Wi-Fi hotspot.
3. Tap the Portable Wi-Fi hotspot switch to activate it. After a moment, the phone starts broadcasting its Wi-Fi network name (SSID), so you can connect it with up to eight (8) computers or other phones.
4. To change the network name (SSID) or secure its Wi-Fi network, tap Set up Wi-Fi hotspot.
5. In the dialog box, configure the options:
- Tap the Network SSID field and enter a new network SSID (name) that other computers see when scanning for Wi-Fi networks.
- To secure the Wi-Fi network, tap the Security menu and select WPAP2 PSK (Wi-Fi Protected Access 2 with a Preshared Key). When a password field is added to the dialog box, enter a password. You will need to enter this password when you connect the phone‘s hotspot with a computer or other phone.
- Tap the SSID Visibility field to decide if you want your hotspot to be displayed to other devices.
- To limit the number of phones to share your phone’s data connection, tap Max users and select the number of the phones to limit.
6. Tap Save.
Setting Swipe, Face Unlock, Pattern, PIN, Password to Unlock Your LG G Pro 2
You can slide the screen without entering any information, utilize facial recognition, draw your own unlock Pattern or enter a PIN or Password to add more security to your device.
To set Swipe, Face Unlock, Pattern, PIN, or Password:
1. Tap Home icon > Menu icon > System settings.You can slide the screen without entering any information, utilize facial recognition, draw your own unlock Pattern or enter a PIN or Password to add more security to your device.
To set Swipe, Face Unlock, Pattern, PIN, or Password:
2. From the DEVICE section, tap Lock screen > Select screen lock.
3. Select the desired screen lock option from the following options.
- None: No lock screen.
- Swipe: Swipe any part of the screen to unlock the screen.
- Face Unlock: Unlocks the screen through facial recognition. Follow the prompts. You are asked to set a Pattern and/or PIN as a backup.
- Pattern: Opens a set of screens that guide you through drawing a screen unlock pattern. Its recommended that you enter backup PIN as well in case that you might lost the pattern. Then, you can set vibrate on touch or whether to make the pattern visible.
- PIN: Enter a numeric PIN to unlock screen.
- Password: Enter a password to unlock screen.
From then on, any time you wish to turn the phone on or unlock the screen, you must draw your unlock pattern or enter the PIN or password to unlock the screen.
- If you have set up Unlock PIN or Unlock Password, enter the Unlock PIN or Unlock Password. After entering it, tap OK. The last screen you were working on opens.
Note: You have five opportunities to enter your unlock Pattern, PIN or Password. If youve entered
the wrong information five times, you must wait 30 seconds before you can attempt again.
- If you have set up a Google Account on the phone, tap the Forgot pattern? button. You will be able to unlock the phone with your Google Account username and password or entering you Backup PIN.
- If you haven’t created a Google Account on the phone, you must perform a factory reset.
How to Turn On Direct/Android Beam on LG G Flex
When this feature is turned on, you can beam app content to another NFC-capable device by holding the devices close together. For example, you can beam Browser pages, YouTube videos, contacts, Polaris Office 4 files, and more. Just bring the devices together (typically back to back) and then touch your screen. The app determines what gets beamed.
To activate Direct/Android Beam:
- From the Home screen, tap the Menu icon.
- Select All settings, then go to Share & Connect
- Finally, tap the Direct/Android Beam switch to turn on. (NFC turns on automatically)
SmartShare Beam
Turn on to receive multimedia contents via SmartShare Beam from LG phones or tablets.
Turn On SmartShare Beam:
1. Tap Home icon > Menu icon > System settings > Share & connect.
2. Tap the SmartShare Beam and tap the SmartShare Beam switch to activate the feature.
3. Turn on the SmartShare Beam feature on other LG phones or tablets supporting SmartShare Beam to send/receive photos, musics, videos and documents.
You can mirror phone screen and sound onto LG Miracast dongle or TV wirelessly.
1. Tap Home icon > Menu icon > System settings > Share & connect > Miracast.
2. Tap the Miracast switch to turn on this feature.
3. Turn on the Miracast feature on your TV or connect to a LG Miracast dongle
Wireless Storage
To manage files on your phone in the computer or copy files to the phone from the computer without a USB connection.
Turn On Wireless Storage:
1. Tap Home icon > Menu icon > System settings > Share & connect.
2. Tap the Wireless storage and tap the Wireless storage switch to activate the feature.
3. Connect to a network, then select the devices to allow connection.
4. Enter the URL shown on your phone in the address bar of the browser on your computer to access your phones photos and other files wirelessly from your computer.
USB Tethering
You can share your phone’s data connection with a computer by turning on the USB tethering.
To share your phones data connection via USB cable:
1. Tap on the Home Icon > Menu icon.
2. Go to System settings > More... >
3. Connect your phone to your computer with a USB cable.
2. Go to System settings > More... >
3. Connect your phone to your computer with a USB cable.
4. Tap the USB tethering switch to activate. Then tap OK to confirm.
Note: You cannot access your phones memory on your computer when using USB tethering.
Bluetooth Tethering
This feature allows you to connect other devices to your phone via Bluetooth and share its internet connection.
Turn on Bluetooth Tethering:
1. Tap on the Home Icon > Menu icon.
2. Go to System settings > More... >
2. Go to System settings > More... >
3. Tap the Bluetooth tethering switch to activate.
Font Size
Choose the desired font size for device menus.
1. Tap on the Home Icon > Menu icon > System settings.
2. From the DEVICE section, tap Display > Font size.
3. Tap a desired font size.
Smart Screen
Keep the screen on when device detects your eyes looking at the screen.
1. Tap on the Home Icon > Menu icon > System settings.
2. From the DEVICE section, tap Display > Smart screen (A blue checkmark will appear).
Smart Video
Video pauses when the phone detects you are not looking at the screen.
1. Tap on the Home Icon > Menu icon > System settings.
2. From the DEVICE section, tap Display > Smart video (A blue checkmark will appear).
Home Screen
Configure your phones home screen settings.
Select Home
Allows you to select the default Home screen launcher.
1. Tap on the Home Icon > Menu icon > System settings.
2. From the DEVICE section, tap Home screen > Select Home.
3. Tap the desired option.
Theme
Choose the desired theme.
1. Tap on the Home Icon > Menu icon > System settings.
2. From the DEVICE section, tap Home screen > Theme.
3. Select the desired theme and tap Apply.
Wallpaper
Choose the desired wallpaper.
1. Tap on the Home Icon > Menu icon > System settings.
2. From the DEVICE section, tap Home screen > Wallpaper.
3. Choose a location and select the desired wallpaper.
4. Tap Set wallpaper or Apply to set it as the wallpaper.
Screen Swipe Effect
Choose the desired type of effect to display when you swipe from one Home screen canvas to the next.
1. Tap on the Home Icon > Menu icon > System settings.
2. From the DEVICE section, tap Home screen > Screen swipe effect.
3. Tap the desired effect and OK.
Wednesday, August 27, 2014
Nokia Lumia 710 Tips and Tricks
How to Hard Reset (Factory Reset) Nokia Lumia 710
There are two ways on how to reset your Nokia Lumia 710, it can be through the hard reset or soft reset. When you say hard reset it involves on the hardware part, so you need to remove the battery of you Nokia Lumia 710 and reinsert it. Then turn on your device normally. This should refresh the content of your device but will not remove any data.
Software reset will return your device to its default settings. Like a brand new phone, no information or data saved on your device. This procedure will erase all your data save on your phone.
If your Nokia Lumia 710 is frozen, it is recommended to perform the Hard Reset.
You can soft reset your Nokia Lumia in two ways. By accessing it through settings or doing the hard key combination.
Resetting through the settings:
Go to Settings > About > reset your phone.
Hard Key Combination:
Use this option if your device is locked and you dont know the code.
Note: Make sure that your Nokia Lumia is turned off.
Step 1. Press and hold the power key until it vibrates then release.
Step 2. Press and hold the down key volume. If the exclamation mark will be shown on the screen, you can now release the button.
Step 3. You need to input these key combination:
Volume Up > Volume Down > Power > Volume Down.
Your phone will reset and will boot up automatically. This might take a several minutes.
How to Import Contacts From Old Phone to New Phone (on iPhone, Samsung, HTC and Nokia)
Read More..
There are two ways on how to reset your Nokia Lumia 710, it can be through the hard reset or soft reset. When you say hard reset it involves on the hardware part, so you need to remove the battery of you Nokia Lumia 710 and reinsert it. Then turn on your device normally. This should refresh the content of your device but will not remove any data.
Software reset will return your device to its default settings. Like a brand new phone, no information or data saved on your device. This procedure will erase all your data save on your phone.
If your Nokia Lumia 710 is frozen, it is recommended to perform the Hard Reset.
You can soft reset your Nokia Lumia in two ways. By accessing it through settings or doing the hard key combination.
Resetting through the settings:
Go to Settings > About > reset your phone.
Hard Key Combination:
Use this option if your device is locked and you dont know the code.
Note: Make sure that your Nokia Lumia is turned off.
Step 1. Press and hold the power key until it vibrates then release.
Step 2. Press and hold the down key volume. If the exclamation mark will be shown on the screen, you can now release the button.
Step 3. You need to input these key combination:
Volume Up > Volume Down > Power > Volume Down.
Your phone will reset and will boot up automatically. This might take a several minutes.
Contacts is very important for everyone of us. We cant connect to our friends without a contact number. If you have a new phone, saving contacts on the phone one by one is so hassle. But now, theres an easy way how to transfer or import your contacts from your old phone to your new phone.
Use your PC to transfer contacts to your new phone. This process is applicable in several phone brands, including iPhone, Samsung, HTC and Nokia.
You just need an Internet Connection on your PC, your old and new phone and their own USB cable.
If you are not prompted with a pop-up window to install the PC Companion, you can also download the PC Companion here.
How to Update Your Nokia Lumia 710
There will come a time that Nokia or your Internet Service Provider (ISP) will give a software update for Nokia Lumia device. Verizon did update the Nokia Lumia 822 and has been already rolled out via OTA (Over The Air). The update may come by batch, but if you have not receive the update for a while, then you may need to manually check for the updates.
How to Extend Battery Life of Nokia Lumia 710
Use your PC to transfer contacts to your new phone. This process is applicable in several phone brands, including iPhone, Samsung, HTC and Nokia.
You just need an Internet Connection on your PC, your old and new phone and their own USB cable.
Then you need to install the PC Companion program. This is a free application and the installation files are already saved on your new phone. This program can also be used in updating your phone software.
Please note that if you are using the Microsoft Windows 7 operating system on your PC, make sure that the AutoPlay setting is enabled.
To check your settings:
Click Start > Control Panel, then type "autoplay" on the search box. Click the AutoPlay, and mark the check box Use AutoPlay for all media and devices.
Installing the PC Companion:
Installing the PC Companion:
- Turn on your new Phone and connect it to your PC.
- On your new Phone, tap "Install" to install PC Companion on the PC.
- On your computer, if a pop-up window that appears notifies you about available PC Software, select Run Startme.exe.
- Then click Install to start the installation and then follow the instructions to complete the installation.
If you are not prompted with a pop-up window to install the PC Companion, you can also download the PC Companion here.
Transferring your contacts to your new phone:
- Make sure that PC Companion is installed on your PC.
- Open the PC Companion application on your PC.
- Then click Contacts Setup and follow the instructions to transfer your contacts.
There will come a time that Nokia or your Internet Service Provider (ISP) will give a software update for Nokia Lumia device. Verizon did update the Nokia Lumia 822 and has been already rolled out via OTA (Over The Air). The update may come by batch, but if you have not receive the update for a while, then you may need to manually check for the updates.
How to manually check for updates on your Nokia Lumia:
- Go to Settings, and select Phone Update.
- To check for the new updates just tap on Check for Updates.
You need to update your device to experience the improvements and some features added on your Nokia Lumia device.
Battery Life depends on how you use your device. For Nokia Lumia 710 device, if you want to save your battery to last longer hours, you may need to adjust your settings. Follow these suggestions:
• Turn on the power-saving option on the device. Then lessen the screen brightness and the screen lock timeout. On the Home Screen, swipe left, then tap on the Gear Icon or Settings > Battery saver.
- Be reminded that when your phone goes into battery saver mode, you may not be able to change the settings of all apps.
- If you want to change the settings of the Battery saver, tap on Advanced.
• Turn down your device volume with the volume keys.
• Close any apps or features when you are done using it so they will not continuously running in the background.
• Turn off the network connection if you are out of range so that your device will stop searching for a network signal.
• You should use the latest version of the software update. Software updates improves some features and fixes some bugs on the previous software version.
• Turn off the camera flash.
• The camera viewfinder can be a power drain, so after youve finished taking photos, press the left arrow key.
Nokia X6 Charging No Response Problem Solution
Nokia X6 Charging Ways Jumper Solution 100% Tested .

Read More..

Nokia 103 RM 647 Latest Firmware mcu ppm cnt Free DOWNLOAD
Nokia Latest update flash file firmware with free Direct download And Now Enjoy This Time

Nokia 1280 RM-647 Version 7.0 latest flash files Free direct download only 3 files MCU,PPM,CNT just click on file for direct download .
Version 7.0 Urdu
Download
Version 3.60
Download
Version 5.80
Download
HTC First Tips and Tricks
How to Factory Reset (Hard Reset) HTC First
Resetting your HTC First will restore the default settings of your device. It will also delete all your files on your phone, so it is recommended to have a backup of your important files on your computer. There are two ways on how to reset your HTC First. It can be done through the settings or through the hardware buttons.
Resetting HTC First on Settings:
Resetting HTC First by Hardware Buttons:
These steps is also helpful when your HTC First is unresponsive or frozen and theres no way to access the settings.
Soft Reset:
Press and hold the Power button for at least 10 seconds. HTC First then restarts.
How to Import Contacts From Old Phone to New Phone (on iPhone, Samsung, HTC and Nokia)
Contacts is very important for everyone of us. We cant connect to our friends without a contact number. If you have a new phone, saving contacts on the phone one by one is so hassle. But now, theres an easy way how to transfer or import your contacts from your old phone to your new phone.
Use your PC to transfer contacts to your new phone. This process is applicable in several phone brands, including iPhone, Samsung, HTC and Nokia.
You just need an Internet Connection on your PC, your old and new phone and their own USB cable.
If you are not prompted with a pop-up window to install the PC Companion, you can also download the PC Companion here.
How to Open and Customize the App Launcher on HTC First
By adding your favourite or often used apps on the app launcher, you can then open apps in just a snap. The steps below will show you how to open HTC First’s app launcher and even customize it for easy access.
Read More..
Resetting your HTC First will restore the default settings of your device. It will also delete all your files on your phone, so it is recommended to have a backup of your important files on your computer. There are two ways on how to reset your HTC First. It can be done through the settings or through the hardware buttons.
Resetting HTC First on Settings:
- Slide the Notifications panel open, and then tap the Gear Icon or Settings.
- Select Backup & reset.
- Tap Reset phone.
- If you want to delete all your files, then tap Erase all data.
- Then tap OK to confirm.
These steps is also helpful when your HTC First is unresponsive or frozen and theres no way to access the settings.
- First, press and hold the Volume Down button, and then do the same way on the Power button.
- Hold the two buttons until the three Android images appear on the screen.
- Release the button when the three Android images appear and press Volume Down.
- Tap on Factory Reset, and then press the Power Button to confirm.
Soft Reset:
Press and hold the Power button for at least 10 seconds. HTC First then restarts.
Contacts is very important for everyone of us. We cant connect to our friends without a contact number. If you have a new phone, saving contacts on the phone one by one is so hassle. But now, theres an easy way how to transfer or import your contacts from your old phone to your new phone.
Use your PC to transfer contacts to your new phone. This process is applicable in several phone brands, including iPhone, Samsung, HTC and Nokia.
You just need an Internet Connection on your PC, your old and new phone and their own USB cable.
Then you need to install the PC Companion program. This is a free application and the installation files are already saved on your new phone. This program can also be used in updating your phone software.
Please note that if you are using the Microsoft Windows 7 operating system on your PC, make sure that the AutoPlay setting is enabled.
To check your settings:
Click Start > Control Panel, then type "autoplay" on the search box. Click the AutoPlay, and mark the check box Use AutoPlay for all media and devices.
Installing the PC Companion:
Installing the PC Companion:
- Turn on your new Phone and connect it to your PC.
- On your new Phone, tap "Install" to install PC Companion on the PC.
- On your computer, if a pop-up window that appears notifies you about available PC Software, select Run Startme.exe.
- Then click Install to start the installation and then follow the instructions to complete the installation.
If you are not prompted with a pop-up window to install the PC Companion, you can also download the PC Companion here.
Transferring your contacts to your new phone:
- Make sure that PC Companion is installed on your PC.
- Open the PC Companion application on your PC.
- Then click Contacts Setup and follow the instructions to transfer your contacts.
How to Set HTC First into Sleep Mode
Like any other device, setting HTC First into sleep mode will somehow save its battery life. Sleep mode puts your device into a lower power state while the display is off. It also prevents accidental button presses when its in your pocket or bag. Heres how you can set HTC First into sleep mode.
1. Briefly press on your devices Power button to turn off the display. Then switch to Sleep Mode.
2. To change the time before your device sleeps, just go to Settings > Display.
3. To wake it up, manually press the Power button and unlock your screen.
4. Your device will also automatically wakes up when you have an incoming call.
How to Extend Battery Life of HTC First
Battery Life depends on how you use your device. For HTC First device, if you want to save your battery to last longer hours, you may need to adjust your settings. Follow these suggestions:
• Monitor the usage of your battery:
1. On the Apps screen, tap Settings.
2. Tap Battery.
3. Tap an app to check how its using the battery. Youll see how much battery power is used
• Turn down your device volume with the volume keys.
• Then lessen the screen brightness and the screen lock timeout.
• Close any apps or features when you are done using it so they will not continuously running in the background.
• Turn off the network connection if you are out of range so that your device will stop searching for a network signal.
• You should use the latest version of the software update. Software updates improves some features and fixes some bugs on the previous software version.
• Turn off the camera flash.
• The camera viewfinder can be a power drain, so after youve finished taking photos.
How to Take Screenshots on HTC First
Did you just create a nice piece of art on your new HTC First phone? Or perhaps youve just personalized your screen, or share your high game score and want others to know how youve come up with it.Well, take a screenshot and brag it to your friends. Its easy to take a picture of the screen and share it from Gallery.
Heres how you can capture a screenshot of your HTC First device.
- Simultaneously press and hold Power and Volume Down buttons.
- The screen is saved in the Screenshots album in Gallery.
How to Clear Call History on HTC First
Either your call logs are just piling up or you simply want to achieve a clean call history list, then you can do the steps below. Heres how to delete or clear call history on your HTC First device.
To delete one name or number
1. On your devices Call History tab, press and hold the name or number you wish to delete.
2. And tap Delete from call history.
To delete the entire call history list
1. On Call History tab, tap then go to Remove call history.
2. On the Delete from call history screen, tap
3. Choose Select all and then tap Delete.
How to Make Your HTC First a Wireless Router/Portable Wi-Fi Hotspot
Smartphones these days can now share its mobile data connection and act as a portable Wi-Fi hotspot. And like those high-end gadgets, HTC First is sure to let you experience the benefits of making it as a portable Wi-Fi hotspot. Heres how you can make your HTC First phone the next Wi-Fi hotspot.
Either your call logs are just piling up or you simply want to achieve a clean call history list, then you can do the steps below. Heres how to delete or clear call history on your HTC First device.
To delete one name or number
1. On your devices Call History tab, press and hold the name or number you wish to delete.
2. And tap Delete from call history.
To delete the entire call history list
then go to Remove call history.2. On the Delete from call history screen, tap
3. Choose Select all and then tap Delete.
How to Make Your HTC First a Wireless Router/Portable Wi-Fi Hotspot
Smartphones these days can now share its mobile data connection and act as a portable Wi-Fi hotspot. And like those high-end gadgets, HTC First is sure to let you experience the benefits of making it as a portable Wi-Fi hotspot. Heres how you can make your HTC First phone the next Wi-Fi hotspot.
- Slide the Notifications panel open, and then tap the Gear Icon or Settings.
- Under Wireless & Network, tap More.
- Select Mobile network sharing > Portable Wi-Fi hotspot settings.
- Enter your preferred router name, or you can also use the default name.
- Choose the type of security and set a password for your wireless router. (If you selected none, then you dont have to enter a password.)
- Select the Portable Wi-Fi Hotspot option to turn on the wireless router.
When you see the router wireless icon, then your HTC First is ready to be used as a router.
How to Open and Customize the App Launcher on HTC First
By adding your favourite or often used apps on the app launcher, you can then open apps in just a snap. The steps below will show you how to open HTC First’s app launcher and even customize it for easy access.
1. To open the app launcher from your cover feed screen,press and hold your profile picture and drag it to 
2. Now you can share directly to Facebook by
tapping to post a status
to post a status tapping to post a photo
to post a photo tapping to check into a location.
to check into a location.3. To add your favorite apps to the app launcher for easy access, first swipe right to on the app launcher to see the list of all your apps.
4. And press and hold an app adn drag it to your app launcher on the right.
How to Use Facebook Camera on HTC First
HTC First allows you to snap photos and tag your Facebook friends right away. In this manner, youll get to post photos and tag your friends in an instant. Heres how to use the Facebook camera on HTC First.
 Photo.
How to Use Facebook Camera on HTC First
HTC First allows you to snap photos and tag your Facebook friends right away. In this manner, youll get to post photos and tag your friends in an instant. Heres how to use the Facebook camera on HTC First.
Photo.2. Then at the bottom of then photo gallery screen, tap
.
3. Now youre ready to take a photo. Just point the camera at what you want to capture and tap 
4. Once youre done taking a photo, tap
5. Tap  on photos you want to post and tap
 to add description. And tap Post.
on photos you want to post and tapto add description. And tap Post.6. Tap a photo thumbnail and tap your friends faces to tag a photo.
How to Use Facebook Messenger on HTC First
When you dont feel like calling your pal using Facebooks free voice calls on your phone then Facebook messenger is a great alternative. Use this app to start private conversations via with your FB friends or to send text messages. Heres how you can use this app on HTC First.
1. On your device cover feed, press and hold your profile picture and drag it to 
2. Then tap  to choose a friend to message or simply type a mobile number to send a text.
to choose a friend to message or simply type a mobile number to send a text.3. Now type your message and then tap Send.
How to Turn on NFC on HTC First
Smartphones these days mostly have built-in Near Field Communication or NFC which allows easy sharing of contents like web pages, photos or contacts to someones NFC-enabled mobile device. Heres how to use this feature on HTC First.
How to Turn on NFC on HTC First
Smartphones these days mostly have built-in Near Field Communication or NFC which allows easy sharing of contents like web pages, photos or contacts to someones NFC-enabled mobile device. Heres how to use this feature on HTC First.
1. To turn on NFC and Android Beam feature on your phone, go to Settings.
2. Under Wireless and Networks, tap More.
3. Then from there you can now turn on the NFC and Android Beam options.
4. To share contents, both devices must have NFC and Android Beam feature turned on.
5. On the screen where you want to share the content, hold your device and the other device back to back.
6. You will then hear a sound and both devices will vibrate slightly when connected.
7. And tap screen which you want to share. Then the shared content will now appear on the recipients screen.
Sony Xperia TX LT29i factory data reset
| Sony Xperia TX LT29i factory data reset |
Performing factory data reset ( master reset or hard reset ) Sony Xperia TX LT29i via Settings menu:
Performing factory reset
Warning! To avoid permanent phone damage, do not restart the phone while a reset procedure is underway.
- Tap Applications from Home screen
- Tap Settings
- Tap Backup & reset
- Tap Factory data reset
- TapReset phone
- Tap Erase Everything
Warning! All data will be erased from device memory, including system and application data, settings and downloaded applications. Back up your important data. The device will restore to factory settings.
If your phone hangs or does not responding, Press and hold power key about 10 seconds. It will rebooting automatically. Or remove and re insert the battery and SIM Card.
Tuesday, August 26, 2014

Nokia C1 Solution for C1 01Not Charging Problem
Heres the solution for Nokia C1-01 Not Charging problem like there is No Charging indication shows on the display when the battery charger is being plug-in.
This problem is may caused by a faulty charger or a faulty components on nokia c1-01 PCB board. This problem may sometimes happens if the device suffered wet or water damaged or just exist.
The solution below will show us the location of the particular components that needs to be check or by then replace if found damaged.
Nokia C1-01 Not Charging Solution-Charger No response
Repair Hints For C1-01 Not Charging:
Check the charging pin connector, ensure that it is clean free from oxidation build up and the terminals were not bended and misaligned.
Clean also the charging pin contact pads on the PCB board.
Check the fuse if it is open or already blown out. A damaged fuse indicates that there is a shorted circuit or components happens on the PCB board. Check the chip diode if shorted, and then replace it.
Samsung Galaxy S3 Flash Light Problem Solution

Nokia X5 01 Insert SIM card solution
Nokia X5-01 SIM card connection line paths (SIM card ways)
iPhone 4s Display Light Not Working easy Solution

Monday, August 25, 2014
Nokia 2710 Charging Not Save Solution Fake Charge Solution

now i share this how to working fine
1.First Chk your Mobile to connect charger & testing multimeters to out/put corrent voltage
2.mobile out/put charging voltage coming minimum (2.30V-3.0V)
3.your mobile work For Colum-2 Step?
4.then your mobile have no problem :)
5.About No Coming your Mobile Step2 Colum
6.then working For Your Mobile to My Tutorial
7.Now see how to working your favoured handset & Follow which parts to replace for work me
you have no this parts no problem now collect to others model set have this now i share which model have this parts-
1280,1616,c2-05 etc must more
.can i help you to solved your problem ?
Please Write Me Only One Comment:) Dont waste your time to writing comment ok no problem no give me only 5 Seconds to Share My Post
Working 100 Symphony M50 Flash File All Version Free DOWNLOAD
Symphony M50 (MTK-6253)


Info - 04
WBG1000Z_0101_PCB01_GPRS_MT6253_S00.1000Z_0101_V18 76.BIN
Project ID : 1000Z_0101_V1876
Password : Ashfaq_Tawhid_Rayan
Info - 05
WBG1000Z_0101_PCB01_GPRS_MT6253_S00.1000Z_0101_V18 17.BIN
Project ID : 1000Z_0101_V1817
CPU_Type = MT6253
Flash ID = 00898903
NOR_Size = 0x1000000(16MB)
Flash Type = INTEL_PF38F30xxMOx1xx
Password : Ashfaq~Tawhid~Rayan
Read More..
Info - 01
WBG1000Z_0101_PCB01_GPRS_MT6253_S00.1000Z_0101_V18 25.BIN
Project ID : 1000Z_0101_V1825WBG1000Z_0101_PCB01_GPRS_MT6253_S00.1000Z_0101_V18 25.BIN
Info - 02
WBG1000Z_0101_PCB01_GPRS_MT6253_S00.1000Z_0101_V19 03.BIN
Project ID : 1000Z_0101_V1903WBG1000Z_0101_PCB01_GPRS_MT6253_S00.1000Z_0101_V19 03.BIN
Info - 03
WBG1000Z_0101_PCB01_GPRS_MT6253_S00.1000Z_0101_V19 22.BIN
Project ID : 1000Z_0101_V1922WBG1000Z_0101_PCB01_GPRS_MT6253_S00.1000Z_0101_V19 22.BIN
Info - 04
WBG1000Z_0101_PCB01_GPRS_MT6253_S00.1000Z_0101_V18 76.BIN
Project ID : 1000Z_0101_V1876
Password : Ashfaq_Tawhid_Rayan
Info - 05
WBG1000Z_0101_PCB01_GPRS_MT6253_S00.1000Z_0101_V18 17.BIN
Project ID : 1000Z_0101_V1817
CPU_Type = MT6253
Flash ID = 00898903
NOR_Size = 0x1000000(16MB)
Flash Type = INTEL_PF38F30xxMOx1xx
Password : Ashfaq~Tawhid~Rayan

Subscribe to:
Posts (Atom)